Understanding Why Bubbles Form in Your Northridge Garage Floor Coating
📋 In This Guide

Discovering bubbles in your newly installed epoxy garage floor can be frustrating, especially after investing in a premium coating system. For Northridge homeowners, understanding why these imperfections occur is the first step toward effective repair and prevention. Bubbles typically manifest within the first 24-48 hours after application, though sometimes they appear weeks or even months later in older coatings.
The most common culprit behind bubble formation is a phenomenon called outgassing, where trapped air or gases beneath the concrete surface migrate upward through the epoxy coating. In Northridge’s climate—with our warm San Fernando Valley temperatures and low humidity—concrete can heat up significantly, especially in garages that receive afternoon sun exposure. As concrete temperatures rise, any moisture or air trapped in the pores expands and pushes through the semi-cured epoxy, creating those telltale bubble formations.
Moisture-related issues represent another significant cause of bubbling in epoxy floors. Even though Northridge experiences relatively dry conditions compared to coastal areas, concrete slabs can retain moisture from various sources: groundwater wicking up through the slab, previous spills that penetrated deep into the porous concrete, or inadequate curing time after pressure washing during preparation. When epoxy is applied over damp concrete, the moisture tries to escape as the coating cures, resulting in bubbles and sometimes larger blisters.
Temperature fluctuations specific to our region also play a critical role. Northridge can experience temperature swings of 30-40 degrees between early morning and midday, particularly during spring and fall. If epoxy is applied when the concrete is cool (early morning) and then temperatures rise dramatically (afternoon), the rapid expansion of air in the concrete pores can force bubbles through the coating. This is especially problematic in garages near epoxy flooring services in Northridge neighborhoods like Northridge East and West, where homes may lack climate control in garage spaces.
Application errors can also contribute to bubble formation. Mixing epoxy too vigorously introduces excess air into the mixture, applying coats too thickly prevents proper degassing, or working with products that have exceeded their pot life can all create conditions favorable for bubbling. Professional installers at Five Star Epoxy & Coatings understand these challenges and implement proven techniques to minimize these risks during installation.
Diagnosing the Severity and Type of Bubbling in Your Epoxy Floor
Before attempting any repair, accurately diagnosing the extent and cause of bubbling helps determine the appropriate fix. Not all bubbles are created equal, and the repair strategy varies depending on several factors including bubble size, distribution pattern, and timing of appearance.
Small pinhole bubbles (less than 1/8 inch diameter) scattered across the surface typically indicate minor outgassing or air entrapment during application. These are often cosmetic issues that don’t compromise the coating’s protective qualities. Medium bubbles (1/8 to 1/4 inch) may suggest moisture issues or temperature-related expansion, while large blisters (over 1/4 inch) almost always point to significant moisture problems or severe outgassing events.
The distribution pattern tells an important story. If bubbles concentrate in specific areas—perhaps near a water heater, laundry hookup, or exterior wall—moisture intrusion is likely the cause. Uniform distribution across the entire floor suggests application-related issues like mixing problems or inappropriate ambient conditions during installation. Bubbles that appear along the perimeter walls might indicate vapor drive from the surrounding soil, especially in older Northridge homes built before modern vapor barrier requirements.
Timing provides crucial diagnostic clues. Bubbles appearing within hours of application typically result from outgassing or application errors. Those surfacing days or weeks later often stem from moisture issues or inadequate surface preparation. For established floors showing bubbles months or years after installation, the cause usually involves changing environmental conditions: new moisture sources, foundation settling that creates cracks allowing water infiltration, or coating deterioration that allows moisture penetration.
For homeowners throughout the San Fernando Valley, including nearby Epoxy flooring in Granada Hills and Epoxy flooring in Porter Ranch communities, professional assessment can save time and money. Five Star Epoxy & Coatings offers diagnostic services to accurately identify the root cause and recommend appropriate remediation strategies. Call (818) 355-3804 to schedule an evaluation of your bubbled epoxy floor.
DIY Repair Methods for Minor Bubble Issues
For small-scale bubble problems affecting limited areas, several DIY repair approaches can restore your floor’s appearance without professional intervention. Success depends on proper technique and realistic expectations about results.
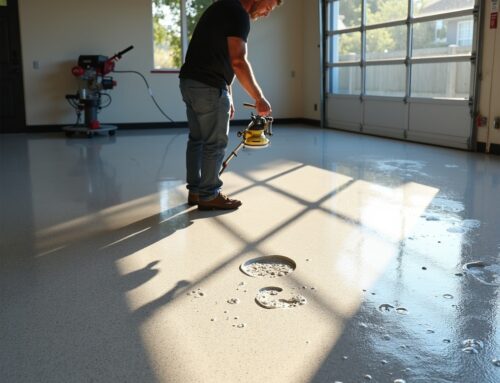
The sandpaper and touch-up method works well for small pinhole bubbles in limited areas. Using 80-grit sandpaper, carefully sand down the bubbled areas until you reach solid, well-adhered coating. Feather the edges to create a smooth transition. Clean the area thoroughly with a tack cloth, then apply a thin coat of matching epoxy or clear topcoat to the sanded section. This approach works best for scattered bubbles covering less than 5% of the total floor area. The key is patience—rushing the sanding process or applying touch-up coating too thickly can create new problems.
For slightly larger bubbles that haven’t completely ruptured, the carefully-timed sanding approach can sometimes save the situation. If you catch bubbles while the epoxy is still in the gel stage (partially cured but not fully hardened), gentle sanding with fine-grit sandpaper can sometimes level them without breaking through to bare concrete. This requires excellent timing—typically 8-12 hours after application in Northridge’s warm climate—and only works if you’re monitoring the floor closely during the curing process.
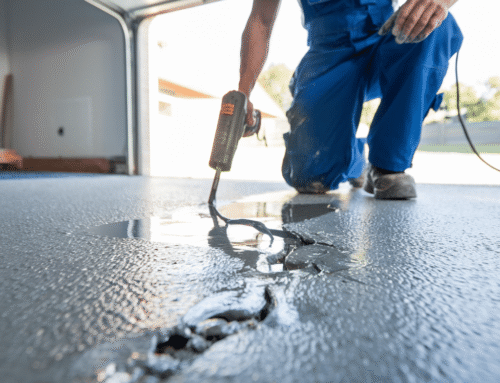
The spot repair technique addresses isolated problem areas up to several square feet. Using a razor scraper or sharp putty knife, carefully remove all bubbled and loose epoxy from the affected section. Sand the edges to create a gradual transition zone. Ensure the concrete is completely dry (use a moisture meter if possible—readings should be below 4% for successful epoxy adhesion). Apply a thin coat of epoxy primer to the bare concrete, followed by your finish coat once the primer tacks up. Blend the edges carefully to minimize the visibility of the repair.
These DIY methods have important limitations. They work best on floors where bubbling affects less than 10% of the total surface area, bubbles are relatively small (under 1/2 inch), and the underlying cause has been identified and corrected. If moisture is the root problem, surface repairs will fail unless you address the moisture source first. Similarly, if outgassing occurred due to extreme temperatures, repairs attempted during similar conditions will likely bubble again.
Homeowners near California State University, Northridge or Northridge Fashion Center should note that DIY repairs may not match the original floor perfectly. Epoxy coatings can vary slightly in color between batches, and achieving a seamless blend requires experience. For high-visibility areas or extensive damage, professional repair typically delivers superior aesthetic results.
Professional Repair Solutions for Extensive Bubbling
When bubbling affects large sections of your garage floor, occurs in a pattern suggesting systemic moisture problems, or DIY attempts have failed, professional intervention becomes necessary. The repair approach depends on the extent of damage and underlying causes.
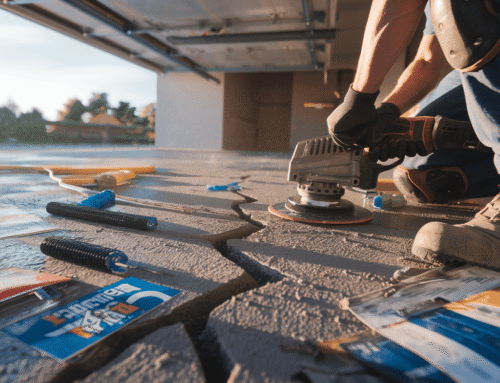
Spot grinding and recoating represents the most common professional repair for moderate bubbling (affecting 10-30% of the floor). Technicians use specialized grinding equipment to remove bubbled sections and feather the edges into surrounding undamaged coating. This creates a mechanical profile that ensures excellent adhesion for repair materials. After thorough cleaning and verification of appropriate moisture levels, professionals apply primer and finish coats that are chemically matched to your existing system. Experienced installers can often blend repairs so effectively that they’re nearly invisible once cured.
For severe cases where bubbling affects more than 30-40% of the floor, complete removal and reinstallation often proves more cost-effective than extensive patching. Professional grinding equipment can remove the entire coating system down to bare concrete. This approach allows for proper moisture testing, correction of any underlying issues, and installation of a fresh coating system with appropriate vapor barriers if needed. While more expensive upfront, this solution provides a warranty-backed floor that will perform reliably for years.
Moisture mitigation becomes essential when testing reveals elevated moisture vapor emission rates. Professional contractors have access to specialized moisture barrier systems and epoxy formulations designed for higher-moisture environments. These products weren’t always available to earlier installers, which is why some older floors develop problems over time. Modern moisture-mitigating primers create a barrier that allows the concrete to breathe while preventing moisture from reaching the topcoat layers.
Advanced diagnostic tools make professional repairs more reliable. Moisture meters, thermal imaging cameras, and core sampling can identify problems invisible to casual inspection. A seemingly minor bubble issue might actually indicate a more significant problem like a leaking water line beneath the slab or foundation drainage issues affecting vapor drive through the concrete.
Five Star Epoxy & Coatings brings extensive experience repairing bubble issues in Northridge area homes. Our team understands the specific challenges presented by San Fernando Valley’s climate and construction methods. We use premium materials designed for California conditions and back our repairs with comprehensive warranties. Whether you need limited spot repairs or complete floor restoration, our technicians have the skills and equipment to deliver lasting results. Contact us at (818) 355-3804 for a thorough assessment and detailed repair quote.
Prevention Strategies for Northridge’s Climate Conditions
Preventing bubbles in epoxy floor coatings requires understanding and accommodating Northridge’s specific environmental conditions. While our dry climate offers some advantages over humid regions, temperature extremes and seasonal variations present unique challenges.
Timing installations appropriately makes a significant difference. Spring (March-May) and fall (October-November) generally offer the most stable conditions for epoxy application in Northridge. Summer temperatures can push garage floors well above the recommended application range, especially in west-facing garages that receive intense afternoon sun. Winter months, while cooler, can bring unexpected rain and higher relative humidity. For optimal results, schedule installations when daytime temperatures will remain between 60-85°F throughout the application and initial curing period. Our Summer Garage Floor Epoxy Survival Guide for Northridge Homeowners provides additional seasonal insights.
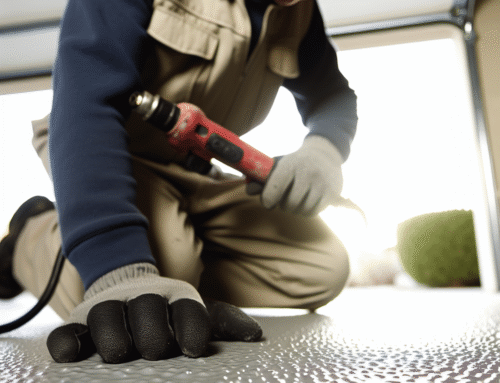
Proper surface preparation cannot be overstated. Professional diamond grinding or shot blasting opens the concrete’s pores and creates the mechanical profile necessary for strong epoxy adhesion, but it also ensures any surface contaminants are removed and hidden moisture issues are revealed before coating application. After preparation, thorough cleaning removes all dust and debris that could interfere with bonding. Many DIY failures and even some professional issues trace back to inadequate surface preparation.
Moisture testing should be mandatory before any epoxy application, even in Northridge’s relatively dry climate. Concrete can retain moisture for months after installation or after significant water events. The calcium chloride test (measuring moisture vapor emission rate) and the plastic sheet test (checking for surface condensation) are both valuable tools. Professional installers routinely perform these tests, but DIY applicators often skip this critical step. For homes in older Northridge neighborhoods built before vapor barriers were standard, moisture testing is especially important.
Controlling application conditions within the garage environment helps prevent temperature-related bubbling. Close garage doors during application to minimize temperature fluctuations and protect against airborne dust. If applying epoxy during warmer months, start early in the morning when concrete temperatures are lowest. Some professionals even pre-cool garage spaces or apply cooling measures to concrete slabs before coating application in extreme heat. Conversely, in cooler weather, ensuring the concrete is at least 55°F before application prevents slow curing and potential bonding issues.
Material selection and mixing practices significantly impact bubble formation. Using high-quality, fresh epoxy formulated for your climate conditions provides better results than bargain products or aged materials. When mixing, stir thoroughly but avoid vigorous whipping that introduces air. After mixing, allowing the epoxy to rest for 2-3 minutes lets introduced air bubbles rise to the surface before application. Using the proper roller cover (typically 3/8″ nap for epoxy) and maintaining consistent roller speed helps minimize air entrainment during application.
For homeowners planning new installations or addressing existing bubble problems, working with experienced local contractors familiar with Northridge’s conditions offers the best outcome. Five Star Epoxy & Coatings has completed hundreds of successful installations throughout the 91324, 91325, and 91330 ZIP codes, developing techniques specifically adapted to our regional climate challenges.
When to Call Professionals Versus Attempting DIY Fixes
Deciding between DIY repair and professional service depends on several factors including the extent of damage, your skill level, available tools, and the floor’s importance to your home’s functionality and value.
DIY repairs make sense for truly minor issues: a few scattered pinhole bubbles covering less than a square foot total, bubbles in low-visibility areas like corners or under storage areas, or situations where cosmetic perfection isn’t critical. If you have experience with epoxy materials, access to proper ventilation and safety equipment, and the time to research proper techniques, small-scale repairs can be accomplished successfully. The material cost for touch-up repairs typically runs $50-150, making DIY economically attractive for limited damage.
However, professional service becomes advisable when bubbling exceeds these limited scenarios. If bubbles cover more than 10% of the floor area, are large (over 1/2 inch), appear in a pattern suggesting moisture problems, or have returned after previous DIY repair attempts, professional expertise is warranted. The diagnostic capabilities professionals bring—moisture meters, experience identifying root causes, access to specialized repair products—often reveal issues that homeowners miss, preventing recurring problems.
For homes valued at Northridge’s median of $805,000, the garage floor represents a significant component of overall property presentation. Poorly executed DIY repairs can actually decrease home value by creating an obviously patched, unprofessional appearance. Professional repairs, conversely, can restore or even enhance value by demonstrating proper maintenance and attention to detail. This consideration becomes especially important if you’re planning to sell within the next few years.
The complexity of the underlying problem matters significantly. Surface-level cosmetic bubbling from minor application issues can often be addressed with basic repairs. Deep moisture problems, structural issues, or bubbling that indicates coating system failure require professional assessment and remediation. Attempting DIY fixes for complex problems often wastes money on materials and effort while allowing the root cause to worsen.
Time and convenience factors deserve consideration. A DIY repair project might seem economical until you factor in multiple trips to suppliers, trial and error with techniques, waiting for proper weather conditions, and the garage being out of service for extended periods. Professional repairs are typically completed in 1-2 days with guaranteed results, minimizing disruption to your household routine.
Safety and proper disposal of materials should also influence your decision. Epoxy systems involve chemicals that require proper ventilation, skin protection, and careful handling. Grinding or removing old epoxy creates dust that needs appropriate containment. Professionals have the safety equipment, training, and waste disposal protocols to handle these concerns properly.
For Northridge homeowners weighing these factors, Five Star Epoxy & Coatings offers free assessments that provide honest recommendations. We’ll evaluate your specific situation and provide options ranging from simple guidance for minor DIY fixes to comprehensive professional repair quotes. Our goal is helping you make the best decision for your circumstances, not pushing unnecessary services. Call (818) 355-3804 to discuss your bubble repair situation with experienced technicians who understand local conditions and challenges.
Many homeowners near Dearborn Park and throughout Northridge’s residential neighborhoods have found that professional assessment provides peace of mind even when DIY repair proves appropriate. Understanding exactly what caused the problem and receiving expert confirmation that your planned approach will work prevents wasted effort and expense on ineffective solutions.
❓ Frequently Asked Questions
Can I fix bubbles in my Northridge epoxy garage floor myself?
Small pinhole bubbles affecting less than 10% of your floor can often be fixed with DIY methods including sanding and touch-up coating. However, extensive bubbling, large blisters over 1/2 inch, or bubbles indicating moisture problems require professional repair. In Northridge's climate, temperature and moisture issues often need expert diagnosis to prevent recurrence. For floors in high-value homes or visible areas, professional repair delivers better aesthetic results and protects your property investment.
What causes bubbles to form in epoxy floor coatings?
Bubbles form primarily from four causes: outgassing (trapped air or gases in concrete rising through the coating), moisture in the concrete slab trying to escape, temperature fluctuations causing air expansion in concrete pores, and application errors like improper mixing or coating too thickly. In Northridge's warm San Fernando Valley climate, temperature-related outgassing is particularly common when concrete heats up during the day after morning application.
How long after installation do epoxy floor bubbles typically appear?
Most bubbles appear within 24-48 hours of epoxy application when outgassing or application issues are the cause. However, moisture-related bubbling can appear days, weeks, or even months later as changing environmental conditions affect the concrete slab. Bubbles in older coatings (years after installation) typically indicate new moisture sources, foundation changes, or coating deterioration allowing water penetration. Professional assessment can determine the cause based on timing and bubble characteristics.
Will bubbles in my epoxy floor get worse over time?
Small cosmetic bubbles caused by air entrapment typically don't worsen and may only affect appearance. However, moisture-driven bubbles often expand and multiply as water continues migrating through the concrete, eventually causing coating delamination. In Northridge's climate, seasonal temperature swings can cause existing bubbles to enlarge. Addressing the root cause promptly prevents progressive damage and more expensive repairs. Professional moisture testing determines whether bubbles will remain stable or continue spreading.
📖 More Tips for Northridge
-
 Epoxy Flooring for Apartment Landings: Safe and Durable Solutions for High-Traffic Areas
Apartment stair landings experience heavy foot traffic every day. Epoxy flooring provides a long-lasting, slip-resistant surface ideal for…
-
A Summer Garage Floor Epoxy Survival Guide for Northridge Homeowners
Summer heat in Northridge creates unique challenges for garage floor epoxy installation. Discover the prep strategies, timing windows,…